Nail pops are an annoyance that can ruin the appearance of an otherwise smooth wall. Fortunately, they are quite easy to fix.
The usual reason for a nail pop is framing lumber with a moisture content that is too high. During installation, the nail has a good grip on the wood. But as the lumber dries, it shrinks away from the drywall, which has the effect of pulling the nail out of the wood. Any pressure on the drywall panel – which now is no longer in contact with the framing – pushes the nail head against the compound concealing it, creating a mound.
The situation will be even worse if the original drywall hanger hung the panel loosely. For best results, you should always press the panel firmly against the framing with one hand while driving the fastener with the other.
A strong light glancing across the surface will help you quickly see nail pops. Screws can also pop, although much less frequently.
Checklist
Time - Driving the nail and applying the first coat of compound may take 10 seconds or less per pop
Tools - Drywall hammer, mud pan with drywall knife
Skills - Driving nails, applying compound
Prep - Move furniture away from walls and remove pictures and other accessories
Materials - Drywall nails, all-purpose compound
Step 1
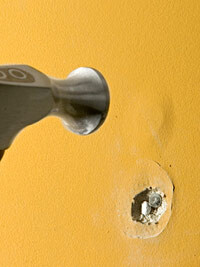
Dig the joint compound out of one mounded area; you’ll find the head of a fastener (usually a nail). Position a new ringshank nail next to the head of the old fastener and drive it with a drywall hammer. The rounded head of the hammer will smash the mound into a dimple.
Step 2
To fix other nail pops, position the new nail slightly off the centerpoint of the mound and drive it to capture the head of the popped fastener. When you nail, push the drywall firmly against the stud or joist.
To tape or not to tape?
Fixing dents and gashes in drywall is a common job. A common question is whether the repair requires a layer of joint tape. Here’s an easy rule of thumb: If the face paper is intact, you can skip the tape. But if the paper is cut or ripped, you’ll need to reinforce the area with tape. Paper tape, which is thinner than fiberglass mesh, is usually easier to conceal.
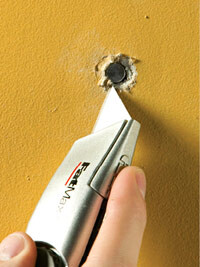
Prep a gashed area by using a utility knife to neatly trim away any snagged face paper, so it won’t get in the way of your repair.
