When you consider that drywall covers the vast majority of your home’s walls and ceilings, it’s almost inevitable you’ll occasionally need to fill a hole. Sometimes the culprit is a doorknob, or a playful youngster – or both. A protective doorknob medallion that sticks or screws onto the wall can hide and prevent this kind of dent. Even in new home construction, it’s quite possible that at least one wall will have a patch before it’s had its first coat of paint.
You’ll simplify the repair process by making the patch first, then tracing its outline onto the wall. When you cut the hole, you know the patch will fit. Reversing the procedure results in a tedious trial-and-error sequence.
Home centers or hardware stores also stock a variety of drywall patches that can speed the repair. Some patches have a self-adhesive back; others must be embedded into joint compound.
It’s a good idea to patch holes promptly. If you wait until a day before guests arrive, you probably won’t have enough drying time for the coats of compound and touch-up paint.
Checklist
Time - Allow 30 minutes to insert the patch and apply the first coat of compound
Tools - Square, utility knife, saw to cut plywood strips, jab saw, drill/driver, joint compound, mud pan, drywall knife
Skills - Cutting drywall, driving screws, applying tape and joint compound
Prep - Put down a dropcloth to protect finished flooring
Materials - Plywood strips, screws, scrap drywall panel for patch material, drywall tape
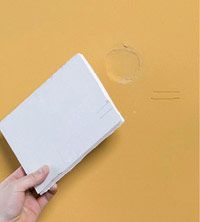
Step 1
The first step in repairing an irregular hole is to square up the opening. Cut a square patch slightly larger than the damaged area, and trace its outline onto the wall. Penciled marks on the wall and patch ensure that you’ll put it in the same position when you fasten it later.
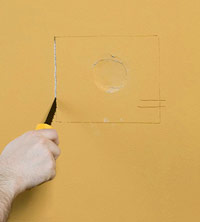
Step 2
Use your jab saw to cut along the penciled perimeter. Cut just to the outside of the line to create a bit of clearance for the edges of the patch so you won’t have to force it into place.
Step 3
Cut 2-inch-wide strips of 3/4-inch plywood about 3 inches longer than the hole’s biggest dimension. Slip a strip through the hole, center its width along the opening, and screw it into position.
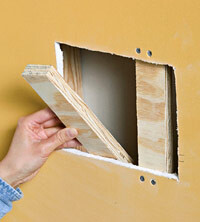
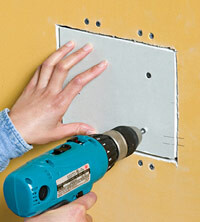
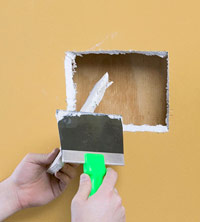
Step 4
Screw the patch to the plywood strips. For large holes, put strips around the entire perimeter of the hole. Apply tape over the edges of the patch, then apply three feathered coats of joint compound to blend the repair to the wall’s surface. Sanding and painting complete the process.
What If… You don’t have wood strips to attach a patch?
You can take advantage of the adhesive property of drywall compound to bond a tapered plug into the hole. To do this, create an inward bevel of about 45 degrees along the hole’s perimeter when you square it. Then rasp down the edges of the patch to an approximate matching hole. When you’re satisfied with the fit, brush loose particles from the mating surfaces of both the hole and patch, and “butter” the edges with joint compound. Push the plug into the hole, and tape the edges. Subsequent coats of compound and sanding follow the usual procedures.
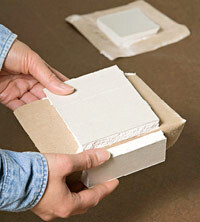
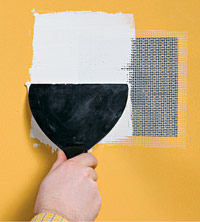
Use a self-stick patch
For a fast patch, consider a self-adhesive sheet of perforated metal or plastic. Trim it to size, if necessary, strip off the backing, and press it into place. No taping is necessary, so you can immediately apply the first coat of joint compound. For a super-sturdy repair, top it with a self-adhesive sheet.
Applying a “hot” patch
Some drywallers like this technique because it eliminates the installation of supports for the patch. Cut the patch about 3 inches larger than the opening it will cover and score lines on the back of the drywall 1-1/2 inches from each edge with a utility knife. Snap the board, but instead of cutting the face paper, carefully peel the gypsum core from the face paper. After cleaning any remaining gypsum from the paper, test-fit the patch. To install it, smear drywall compound around the hole’s perimeter and firmly press the face paper into it. Use a drywall knife to remove excess compound. Two or three feathered coats of compound complete the repair.